Soil compaction is often a significant hidden limiting factor on broadacre farms, silently driving down crop and pasture yields. When soil particles are compressed into a high bulk density, pore space collapses, and mechanical resistance increases dramatically.
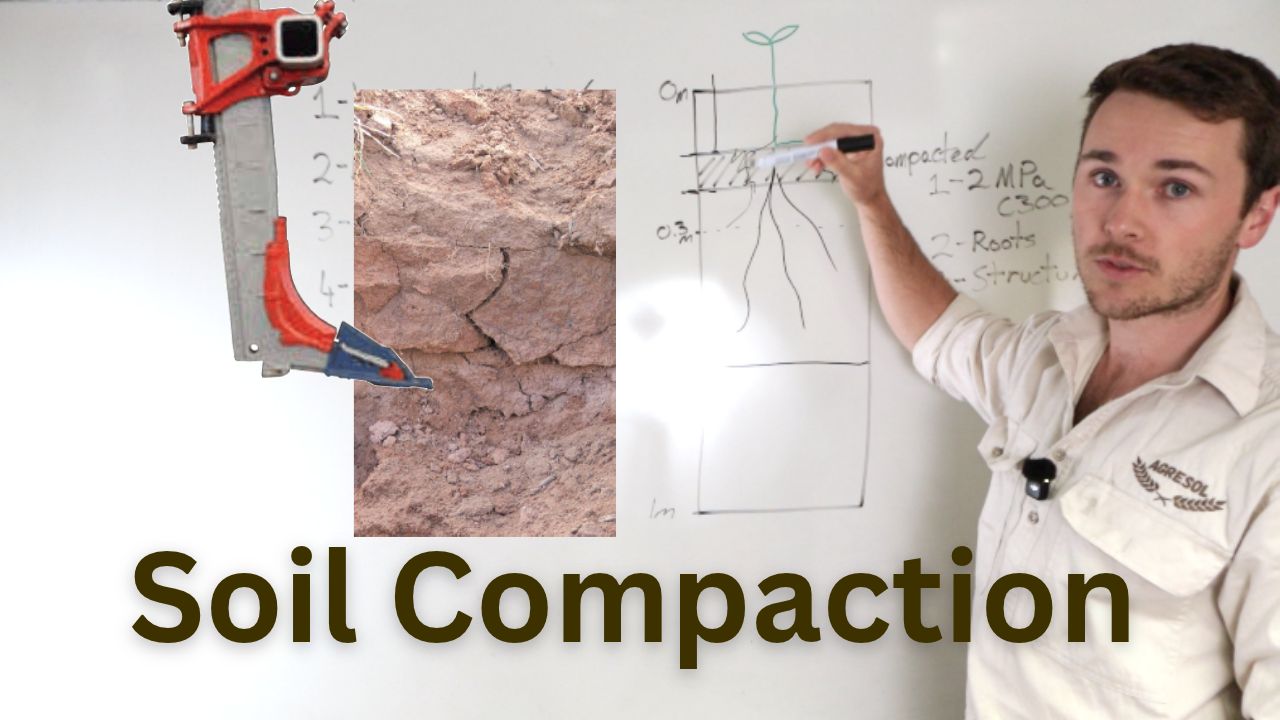
Roots cannot easily penetrate this dense zone. If your crops are confined to exploring only the top 15 cm of soil, they only have access to 15 cm worth of stored nutrition and moisture. In Australia, where water is consistently our most limiting factor, a compacted hardpan limits infiltration and stops us from capturing rainfall deep in the profile.
First watch the video below from our Agresol Youtube channel.
Here is our 4-step playbook to diagnose, evaluate, and fix soil compaction on your farm.
Step 1: Diagnose the Compaction Zone
Before spending money on machinery or tillage, you need to verify whether compaction is actually present.
Start by digging a soil pit down to a depth of roughly one meter using a shovel or an excavator. Once you have a clean vertical profile face, assess three specific indicators:
1. Penetration Resistance
Penetrometers: A penetrometer measures soil strength, where readings above 2 MPa (or 300 PSI) indicate root-limiting resistance. However, penetrometers cost $400 to $500 and are highly sensitive to soil moisture—delivering false hard readings when dry and under-reading when wet.
The Knife or Wire Method: A practical, qualitative alternative is running a soil knife or stiff wire vertically up the profile face. You will feel the exact change in physical resistance directly in your hand.
Pinpoint the Boundaries: Use your knife to identify both the upper boundary and the lower boundary of the hardpan. Penetrometers often only register the top boundary, but knowing the bottom boundary is essential for setting equipment depth and assessing economics.
2. Root Architecture
Look closely at how plant roots move through the profile.
Compacted zones cause taproots and lateral roots to deflect sideways in an unnatural horizontal “J-hook” pattern.
Roots that do penetrate often bunch into narrow fissures rather than exploring the entire soil volume.
3. Soil Aggregation and Structure
Look at the shape of the soil aggregates.
Compacted zones typically exhibit massive, platy, or dense blocky structures rather than loose, crumbly aggregates.
Step 2: Determine if It Is Worth Fixing Economically
Finding compaction does not automatically mean you should bring out heavy machinery. Deep ripping costs between $50 and $100 per hectare in fuel, machinery hours, and wear and tear.
To justify this investment, the intervention must deliver a proven economic return:
The Ideal Scenario for Deep Ripping: GRDC trial data indicates deep ripping is most economical when you have a distinct compacted band within the top 30 cm, and the soil beneath that band is completely uncompacted. Shattering this shallow restriction allows roots to immediately tap into the uncompacted subsoil reserves below.
When Ripping is Uneconomical: If the compaction extends deep through the profile without a clear lower boundary, the diesel and equipment wear required to rip that deep will likely erase your profit margins.
Texture-Contrast (Duplex) Soils: On duplex soils where topsoil sits directly on a heavy, naturally dense clay subsoil, deep ripping rarely produces a sustained economic return.
Step 3: Implement Mechanical Deep Ripping Correctly
If your diagnosis confirms an economic layer, mechanical loosening can reset the profile.
Shatter, Don’t Invert: The goal is purely physical loosening—never invert the soil or bring subsoil clays to the surface.
Use Straight Tines: Use straight-tine implements (such as a Yeomans plow) rather than aggressive inversion tillage.
Tine Spacing: Set tines between 30 cm and 60 cm apart to ensure uniform fracturing between the shanks.
Targeted Working Depth: Set the working depth just deep enough to reach or slightly pass the lower boundary of the compacted layer. Ripping any deeper wastes diesel and causes unnecessary machine strain.
Step 4: Prevent Recompaction and Build Lasting Biology
Mechanically shattered soil is weak, fragile, and prone to rapid recompaction. If you do not follow a deep rip with structural and biological stabilization, you have only purchased a short-term band-aid.
1. Eliminate Traffic Pressure
Cropping: Move toward Controlled Traffic Farming (CTF) tramlines and zero-till seeding to confine heavy wheel tracks to dedicated sacrifice lines.
Livestock: Avoid continuous set stocking, which exposes soils to prolonged trampling. Shift to rotational grazing that provides ample pasture recovery periods.
Stay Off Wet Soils: Never bring heavy machinery into wet paddocks, and avoid livestock pugging during waterlogged conditions.
2. Biological Stabilization Through Photosynthesis
True, long-term soil structure does not come from steel; it is built by plant roots pumping carbon exudates into the profile. You must maximize photosynthetic energy to drive root growth into the shattered zone:
Maximize Photosynthetic Capacity: Use balanced foliar nutrition, avoid overgrazing leaf biomass, and integrate plant diversity to capture sunlight across multiple canopy layers.
Extend the Photosynthetic Window: Use cover crops, companion planting, relay cropping, or longer-season varieties to keep living roots active for more weeks each year.
Follow Steel with Roots: Immediately after deep ripping, sow a vigorous multi-species cover crop or diverse forage mix. The expanding root systems colonize the shattered pan, stabilizing the pore spaces with microbial glues and preventing the soil from slumping shut.
In Livestock Systems: Graze down the existing pasture, deep rip the compacted layer, and allow an extended rest period so the recovering root system can drive deep through the opened subsoil.