Phosphorus is one of the most critical nutrients for plant growth and after N is the second most influential nutrient for yields. Phosphorus however can be a very expensive input meaning applications must be balanced with expected returns. Most soils already contain significant reserves of phosphorus, but much of it is locked away in forms that plants can’t access. For example, in a phosphorus poor soil containing 200ppm of phosphorus, there is an estimated 2800kg of total phosphorus within the top meter of soil. This is the equivalent to nearly 32 tonnes of super! So if there is that much phosphorus already in the soil, why do we need to apply more? We’ll be discussing that in this article.
In conventional systems, the solution is often to apply more phosphorus fertiliser, but in regenerative systems, we ask a better question: How can we support the plant and soil biology to access what’s already there?
This blog series explores how to manage phosphorus regeneratively, optimising productivity with biology, and making better use of your fertiliser budget. We’ll cover everything from the role of phosphorus in plants to how to read soil and sap tests, choose the right fertilisers, and reduce reliance on synthetic P inputs over time.
But first, watch the video below from our YouTube Channel, and make sure to subscribe!
The Role of Phosphorus in Plants: Why It’s Essential for Yield and Resilience
Phosphorus (P) is the second most important mineral in plants for determining yield after nitrogen, yet its behaviour in the soil and uptake by plants is far more complex. While nitrogen can be fixed from the atmosphere, phosphorus is almost entirely sourced from the soil which means availability is directly tied to how we manage our soils.
Despite making up only 0.05–0.5% of a plant’s dry matter, phosphorus plays a vital role in plant growth, resilience, and ultimately, yield. In regenerative agriculture, understanding how phosphorus functions within the plant helps us manage it more efficiently and more affordably without compromising productivity.
1. Phosphorus Powers Plant Energy
Phosphorus is fundamental for the production of ATP (adenosine triphosphate), often referred to as the plant’s energy currency. ATP is required for nearly every metabolic process, from nutrient uptake and conversion to cellular repair and new growth. Without adequate phosphorus, the plant’s ability to function, grow, and adapt is compromised.
2. Phosphorus Builds DNA, RNA and Cell Walls
Phosphorus is also essential for genetic and structural integrity. It’s a key component in the formation of DNA and RNA, which are responsible for cell replication, repair, and protein synthesis. Additionally, it contributes to the formation of phospholipid bilayers, the building blocks of cell membranes. This means phosphorus is literally part of every cell in the plant.
3. Early Root Development Depends on Phosphorus
One of the most critical roles of phosphorus is driving early root development. Within the first 10 days of a plant’s life, access to available phosphorus determines whether it will form a shallow, stunted root system or one that can explore deep soil layers for water and nutrients.
A robust root system not only enhances nutrient and moisture access but also forms the foundation for mycorrhizal colonisation and improved biological interactions, two essential elements in regenerative systems.
4. Phosphorus Influences Grain and Fruit Fill
Phosphorus continues to play a critical role in the reproductive stages of the plant, influencing both grain fill and fruit development. A deficiency during this phase can reduce seed quality and overall yield.
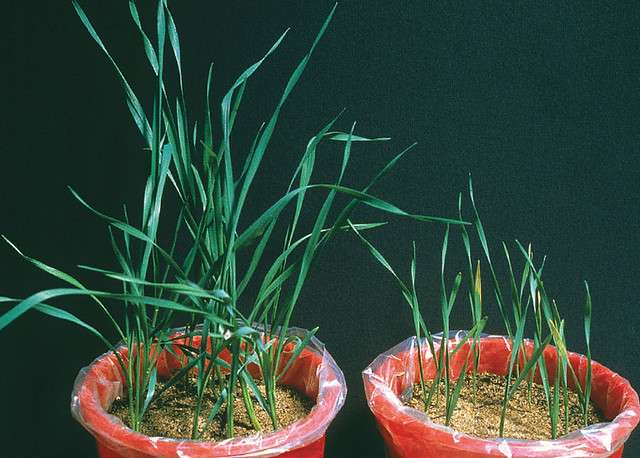
Photo: Phosphorus sufficient plant to the left, phosphorus deficient plant to right. Notice stunted growth, this would significantly affect photosynthetic ability and competition against weeds.
Understanding Phosphorus in the Soil
Phosphorus is one difficult to understand within the soil since there are many interations. While many soils contain large total reserves, equivalent to tens of tonnes of superphosphate, only a tiny fraction is actually available to plants. In regenerative systems, understanding the forms, behaviour, and movement of phosphorus in the soil is crucial for efficient and sustainable management.
1. Four Main Forms of Soil Phosphorus
Phosphorus in the soil exists in four main pools, each varying in availability to plants:
• Soluble (Plant-Available) Phosphorus
This is the small amount of phosphorus dissolved in soil water, mostly in the form of dihydrogen phosphate (H₂PO₄⁻) or hydrogen phosphate (HPO₄²⁻), depending on pH. This is the main form plants can absorb phosphorus.
• Organic Phosphorus
Found in microbial biomass, root residues, and plant litter, this phosphorus must be mineralised by microbes before becoming plant-available. With active biology, this pool can supply up to 40–50% of plant needs. In this interesting study, plants were found to be able to abosrb organic phosphorus in the form of DNA and RNA meaning the contribution from microbial by-products may contribute to phosphorus supply, however it’s difficult to know how much can be supplied in this way. I would suggest that the rhizophagy cycle could also contribut to plant phosphorus supply as the microbial membranes contain phosphorus. Never-the-less, soluble phosphorus is the main form of plant available phosphorus and organic phosphorus after being mineralised, moves into soluble phosphorus.
• Adsorbed (Fixed) Phosphorus
This pool is held on the surface of soil particles like clay, iron, and aluminium oxides. While not chemically bonded, it’s stuck tight enough that availability depends on soil pH, microbial activity, and the presence of organic acids. This pool slowly releases into soluble phosphorus when soluble phosphorus levels become low.
• Mineral (Locked-Up) Phosphorus
Stored in minerals like apatite or bonded tightly to calcium, iron, or aluminium, this form is highly stable and very slow to release. It may take years or decades to become available, especially in the absence of biological activity. However, there are soil microbes that can increase the rate of weathering to release this phosphorus.
2. Phosphorus Doesn’t Move But It Does Lock Up
Unlike nitrogen, which is mobile and prone to leaching, phosphorus binds quickly to soil particles. This means it doesn’t travel far from where it’s placed. But it can be lost through erosion, when topsoil washes or blows away, phosphorus goes with it.
For example, the average errosion rate for Australian croppers is 5.5 tonnes of top soil per hectare per year. Meaning if you had 300ppm of total P (a typical Australian soil), you’d be losing an estimated 1.65kg of phosphorus per hectare each year. This is the equivalent to 18.75kg of super or $11.65/ha/yr.
Soils rich in iron and aluminium (e.g. Ferrosols) tend to “fix” phosphorus more tightly, making less of it available in the short term. Sandy or low-clay soils, on the other hand, tend to have less fixation. This can be measured using the phosphorus buffering index which describes the ability of a soil to fix phosphorus into unavailable phosphorus.
3. Phosphorus and Soil pH
When plants absorb phosphorus from the soil solution, a small amount from the adsorbed or organic pool may replenish it. However, this re-supply is often slower than plant demand, especially during early growth stages when root development is critical.
This is where pH plays a major role:
In acidic soils (pH < 5.5), phosphorus tends to bind with iron and aluminium.
In alkaline soils (pH > 7), it bonds with calcium.
The ideal pH range for phosphorus availability is between 6.0 and 6.8, where fixation is lowest and plant uptake is highest.
Therefore, pH should be a big factor when considering increasing P availability.
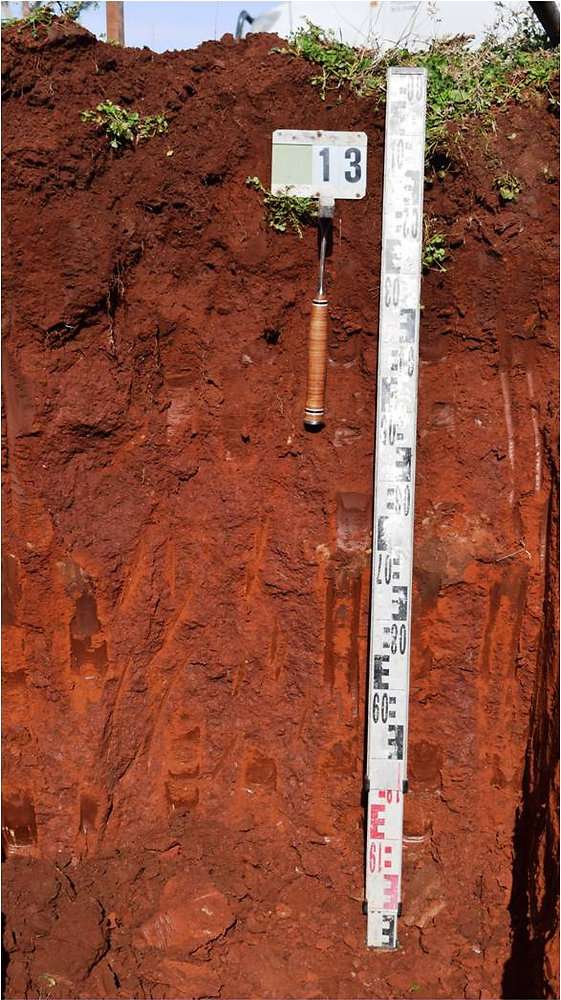
The image below is a red chromosol. Iron oxide gives red soils their colour, and can be roughly used as a indicator of phosphorus lockup.
Soil Testing for Phosphorus
Managing phosphorus regeneratively starts with understanding what’s already in your soil and that means choosing the right test. Phosphorus is unique among nutrients because it exists in multiple forms, each with different levels of plant availability. The test you choose will influence how you interpret your soil’s fertility and how you manage your fertiliser program.
Here’s a breakdown of the most useful phosphorus soil tests and how to use them.
1. Test Types
Phosphorus testing isn’t straightforward. Unlike nitrogen or trace elements, there isn’t a single test that fits all situations. Different soil types, pH levels, and farming systems require different approaches.
Tests typically fall into three categories:
Plant-available phosphorus
Exchangeable phosphorus (available during the growing season)
Total phosphorus (long-term reserves)
2. Tests for Acidic Soils
If your soil is acidic (pH < 7), the following are commonly used:
Bray 1: Measures phosphorus that is immediately available to the plant, the soluble and easily desorbed P. This is your starter P and tells you what’s accessible iearly in the season. Ideal level: 24ppm for loamy soils (Changes with clay content)
Bray 2: Measures both soluble and exchangeable phosphorus , what may become available over the course of the season. Ideal level: 48ppm for loamy soils (Changes with clay content)
3. Tests for Alkaline Soils
For soils with higher pH:
Olsen P: Best for measuring plant-available phosphorus in basic soils. Ideal level: 20ppm for loamy soils.
Colwell P: Measures plant-available and some exchangeable P. Works across a range of pH levels and is often paired with the Phosphorus Buffering Index (PBI), which indicates how tightly phosphorus is held in your soil. The ideal level will change according to the PBI but for a loamy soil, this will typically be 45ppm.
4. Phosphorus Buffering Index (PBI)
The PBI is essential in understanding how much of your applied phosphorus is likely to be fixed (locked up) by the soil. A high PBI means more phosphorus will be tied up and unavailable, so higher application rates are needed to maintain availability.
It also helps determine your critical phosphorus value — the minimum soil P level needed to achieve 90–95% of maximum yield.
5. Total Phosphorus Test (Total P)
Most soil tests only show what’s immediately available, but don’t tell you how much phosphorus you already have stored in the system.
A Total P test captures all forms of phosphorus (except the inaccessible phosphate silicates) including what might be available over decades with good biological activity. This is essential in regenerative systems. If you have hundreds of ppm of total P, you may not need to apply more, you may just need to unlock what’s already there.
We highly recommend a total P test and ideally topsoils soil have greater than 300ppm P.
6. Water-Extractable Phosphorus (WEP)
This test measures the phosphorus that’s actually dissolved in soil water — the form plants take up directly. It’s a good indicator of immediate availability and complements other soil P tests, but isn’t widely used on its own.
7. The Haney Soil Test
The Haney test is becoming more popular for regenerative farmers. It uses weak organic acids to mimic how roots and microbes extract nutrients, giving a more biologically-relevant view of phosphorus availability. It often sits somewhere between Bray 1 and Bray 2 in terms of showing what is available to the plant as it shows whats currently available and available during the season. The ideal level is around 30ppm.
If you’re aiming to reduce fertiliser inputs and lean into biology, this test provides a more functional perspective on nutrient cycling.
Putting It All Together
For a full picture of your phosphorus status, we recommend:
Bray 1 or Olsen for immediate availability
Bray 2 or Colwell for in-season availability
Total P to identify long-term reserves
Haney for biological insight
Combining these tests helps you make better decisions, from whether to apply P at all, or if you need to unlock existing reserves.
Get A FREE Soil Test Analysis
How to Calculate Phosphorus Application Rates (Without Overapplying)
Phosphorus can be a big input costs in many farming systems. Many growers either over-apply “just to be safe” or under-apply which costs yields. In regenerative systems, we want to apply just enough to support crop growth while unlocking the phosphorus that’s already in our soils.
The key? Understanding how to calculate phosphorus application rates based on soil tests, crop removal, and your soil’s ability to store and release phosphorus. From here we’ll understand how to manage it correctly.
1. The Two-Part Phosphorus Strategy: Build-Up and Maintenance
Most application decisions come down to two goals:
• Build-Up — When your soil test is below the critical phosphorus value, your aim is to increase available phosphorus in the soil to meet the crop’s needs.
• Maintenance — Once your soil has adequate phosphorus, you only need to replace what’s removed in the harvested product.
2. Step 1: Calculate Crop Removal
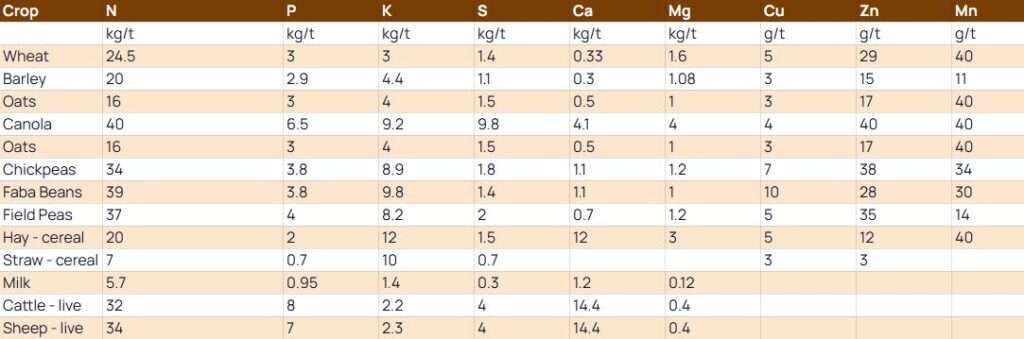
Each crop removes a specific amount of phosphorus in the grain or biomass. For example wheat removes ~3–3.5 kg P per tonne of grain
Example:
If you’re growing a 4-tonne wheat crop and it removes 3.5 kg of phosphorus per tonne, then:
→ 4 t/ha × 3.5 kg/t = 14 kg/ha of P removed
This is your maintenance rate, the amount you need to replace to avoid mining your soil.
Removal rates for hay and straw also need to be considered if they are being transported off the paddock.
Below is an example table of crop removal rates.
3. Step 2: Add a Build-Up Rate (Capital P)
If your soil test shows phosphorus below the critical value (e.g. Bray 1 = 14 ppm, when the target is 24 ppm), you’ll need to add more to build it up. Typically, it is suggested that the concentration of phosphorus is at the critical value to achieve 90-95% of yields. Even in regenerative systems, increasing phosphorus can be a good idea because it is so important for yields.
To work this out:
Subtract current P level from the target (e.g. 24 – 14 = 10 ppm short)
Multiply that by a conversion factor based on soil type and depth (usually ~1.4 kg P per ppm for a 10 cm soil depth at 1.4 bulk density)
So: 10 ppm × 1.4 = 14 kg/ha of P needed for build-up
4. Step 3: Adjust for Fixation
Not all applied phosphorus ends up in the plant. Depending on your soil’s Phosphorus Buffering Index (PBI), 60–95% of it can become fixed in the soil.
That means you may need to apply 2 to 4 times more phosphorus to achieve the increase in available P you’re targeting.
In our example:
If your build-up rate is 14 kg/ha
And your soil locks up 2/3 of applied P
Then you’d need to apply 3 × 14 = 42 kg/ha of phosphorus
Total application = 42 kg for build-up + 14 kg for crop removal = 56 kg/ha of P
Capitial P doesn’t (and shouldn’t) be applied in one application but rather spread the application ovver 3-5 years. This reduces upfront costs and prevents excess phosphorus from locking up other minerals.
So with the 42kg/ha of capitial P, you may want to apply 14kg/ha P each year for 3 years.
Therefore, in this year’s application we would apply 14kg/ha of capital P and 14kg/ha of replacement P resulting in 28kg/ha P.
5. Step 4: Convert to Fertiliser Product
Once you’ve calculated your phosphorus requirement, you need to convert it into the product you’re using.
For example:
MAP contains ~22% phosphorus
So to apply 28 kg/ha of P, you’d need:
→ 28 ÷ 0.22 = ~127 kg/ha of MAP
6. Optimise For Regeneration
The approach above does have alot of merrit and we like to start all nutrition plans from square one, meaning that we will typically use the calculations above to help make an informed decision on nutrition management. However there’s a few key differences in what we do at Agresol and through our consulting.
Since we aim to develop our soils and farms biologically, we aim to allow for more P to be released due to improved soil biology, hence the full capitial rate might not need to be applied as microbes may release P. Therefore we tend to not consider the fixation adjustment and retest the following year. This allows for me dynamic nutrition programs as the addition of cover crops, soil primers and greater soil biology releases total P into available P.
Fertiliser Options for Phosphorus
When it comes to phosphorus fertiliser, not all products are created equal and neither are the outcomes they produce. The type of phosphorus you apply influences everything from plant availability and soil biology to long-term soil health and nutrient cycling. We seperate P fertiliser options into two main categories:
• Fast-Release (Inorganic/Soluble) Phosphorus
These are highly soluble, synthetic products that release phosphorus quickly into the soil solution. Examples include:
MAP (Monoammonium phosphate) – ~22% P
DAP (Diammonium phosphate) – ~20% P
Superphosphate (Single, Double, Triple) – 8.8–20.5% P
Ammonium polyphosphate (liquid or granular) – ~24% P
Monopotassium phosphate (MKP) – ~22.5% P, also used in foliar sprays
Pros:
✔ Immediate availability for starter fertiliser
✔ Supports early root growth and establishment
Cons:
✘ Up to 80% of applied P is fixed (locked up) within 6 weeks
✘ Excess soluble P suppresses mycorrhizal fungi and soil biology
✘ No long-term nutrient release
2. Slow-Release (Organic or Mineral-Based) Phosphorus
These fertilisers release phosphorus gradually over time, often through biological activity. They’re ideal in regenerative systems because they are more friendly to soil microbes.
Options include:
Guano (10–12% P)
Naturally high in P, calcium, and trace minerals. Excellent faster slow-release source that also supports biology.Soft Rock Phosphate (7–10% P)
A clay-based mineral that didn’t reach the hardness of rock phosphate. Releases P slowly and also supplies calcium and silica.Reactive Rock Phosphate
Similar to soft rock but more soluble due to higher reactivity. Better suited for low-pH soils or where faster release is needed.Manures (Variable, e.g. pig: 2.4%, chicken: 1.6%, cattle: 0.7%)
Supply P in a biologically active form, alongside carbon and microbes. Effectiveness depends on composting, transport, and local access.
Pros:
✔ Gentle on soil biology
✔ Supports microbial cycling of phosphorus
✔ Long-term nutrient release
✔ Often includes calcium, silica, carbon and many other minerals.
Cons:
✘ Slower release (not suitable as the only P source in low-P soils)
✘ Often costs more per unit of P
✘ Variable analysis
✘ May not meet immediate early-season crop demand alone
Soil vs Foliar Phosphorus
Phosphorus is best supplied through the soil, particularly for early root development. While some foliar P sprays exist (e.g. MKP) and can be generally effective for correcting deficiencies once a crop, there’s alittle evidence to suggest that they will increase yield. Some evidence suggests fungal disease protection however since P reacts with most trace minerals and calcium, it can be impractical to apply.
Foliar P may have a role in:
Correcting mild deficiencies in young tissue
Supporting disease resistance in some cases
But foliar P shouldn’t replace soil-applied starter P, especially in low-P paddocks. We would suggest phosphorus should mainly be applied through soil applications, ideally as a starter.
The Power of Blending Fast and Slow
A good strategy during transition is to combine fast and slow-release sources. For example MAP (fast) + Soft rock phosphate (slow)
Initially, a 70-30 split of fast to slow can assist in transitioning rates. This can be changed to 30-70 in the future. Another method is to apply the replacement as fast and the captial P as slow. This approach gives your crop the immediate P it needs to get started, while supporting long-term biological cycling and reducing suppression of mycorrhizal fungi.
Using Differential Sap Tests to Monitor Phosphorus in Plants
A differential sap test measures the concentration of nutrients in young (new) and old (mature) leaves of the same plant. The comparison gives insight into how nutrients are being mobilised inside the plant.
Because phosphorus is mobile, the plant will move it from older leaves to younger growth when there’s a deficiency.
We like to use differential sap tests to determine if our starter P applications were sufficient for the season. Since foliar P options aren’t great, the best way to use P in the sap test is by looking backwards and accessing if the application worked. This can help inform next season’s application.
Get A FREE Sap Test Analysis
How to Manage Phosphorus Regeneratively (Without Sacrificing Yield)
When it comes to regenerative phosphorus management, we have two aims:
Supplying just enough to support root development and yield
Avoiding suppression of beneficial soil biology (specifially mycorrhizal fungi)
Here’s how to do it.
1. Prioritise Early Root Development
Phosphorus is essential in the first 10 days after emergence. It fuels root growth, energy transfer (ATP), and plant establishment. Root development is critical because it allows the plant to access more phosphorus, water and other minerals.
Even in all agricultural systems, starter P is non-negotiable so the first step is to ensure you ar appling the correct application rate and start working back from here.
2. Don’t Exceed the Critical P Threshold
When soil phosphorus exceeds the crop’s critical level (e.g. Bray 1 of 24 ppm), the plant no longer relies on biological mechanisms like mycorrhizal fungi or phosphate-solubilising bacteria.
Excess P = suppressed biology.
Soil test first. If P is already at or above the critical level, drop to a maintenance rate (based on crop removal) or skip P altogether and redirect your budget to biology.
3. Apply Humic Substances to all fast fertilisers
Humic and fulvic acids bind to phosphorus, slowing its fixation and making it more plant-available for longer. When using fast-release P (e.g. MAP), coat it with 5% humic acid and reduce the product rate by the same cost.
This improves efficiency, protects soil biology, and stretches your fertiliser dollar further.
Likewise, using a combination of fast and slow fertilisers can be benefitical.
4. Support Mycorrhizal Colonisation
Mycorrhizal fungi can expand the plant’s root zone by up to 100 times, giving access to phosphorus that roots alone can’t reach. To build and maintain healthy fungal populations:
Avoid tillage and fungicides
Minimise synthetic P applications
Use inoculants on seed (cheap and effective)
Maintain living roots in the soil (e.g. cover crops)
Balance soil pH (ideal is 6–6.8)
If your fungi populations are low, apply a mycorrhizal inoculant at seeding (~$7/ha) and reduce phosphorus inputs gradually over time.
If you have just had a long fallow or a canola crop, it is highly recommended to inoculate your crop with mycorrhizal fungi.
5. Add Phosphorus-Solubilising Bacteria
Microbes like Pseudomonas, Bacillus, and Azotobacter release enzymes and organic acids that unlock phosphorus from organic matter, clay surfaces, and minerals.
You can:
Use biological soil primers
Include worm cast extracts or compost teas
Add P-solubilising bacteria products to seed coats or starter blends
These microbes also partner with mycorrhizal fungi, creating a symbiotic exchange network between soil, microbes, and plant roots.
6. Use Cover Crops to Cycle P Naturally
Cover crops feed microbes, stabilise soil, and capture phosphorus into biomass which becomes plant-available when decomposed.
Include species like:
Buckwheat – releases phosphatase enzymes
Lupins or legumes – exude organic acids that unlock mineral P
Grasses – build root mass and microbial habitat
These species help unlock P during their growth and release it to the next crop after termination.
Tip: Use our FREE cover crop mixer to help design a cover crop mix for your goals.
7. Transition Gradually
If you’re currently applying high rates of soluble P, don’t stop cold turkey. Instead, phase in the regenerative system over 3–5 seasons:
Start with a 70% fast / 30% slow P mix
Add humic substances and microbial inoculants
Monitor progress with soil and differential sap tests
Gradually shift to 30% fast / 70% slow, then eventually 100% slow
Track root development, plant health, and phosphorus movement — and only reduce inputs when results are consistent.
Evenutally the maintaince rate we’ve been that works well in regenerative systems is 5-10kg P/ha (20-40kg/ha of MAP). At this rate, mycorrhizal fungi isn’t suppressed and enough P is supplied for early root development.
Conclusion: Regenerating Phosphorus Efficiency From the Ground Up
Phosphorus is essential for roots, for energy, for yield. But more isn’t always better. In fact, applying too much soluble phosphorus can suppress the very biology that helps unlock it from the soil.
What we’ve seen throughout this series is that regenerative phosphorus management isn’t about cutting P out altogether. It’s about using the right form, in the right place, at the right time and pairing it with biology to make every kilogram count.
Key Takeaways from the Series:
Plants need phosphorus early to drive root growth, energy transfer, and reproductive development.
Most soils contain large phosphorus reserves, but they’re often locked up and biologically inactive.
Soil and sap testing together provide a clearer picture of both supply and uptake, allowing for smarter decisions.
Application rates should be based on crop removal, soil test levels, and your soil’s P buffering capacity.
Fertiliser choice matters, blending fast and slow-release P, and using humic substances, improves efficiency.
Biology is the real key — managing fungi, bacteria, cover crops, and carbon inputs to cycle phosphorus naturally.
By focusing on biology and balancing inputs with what your soil can supply, you can lower input costs, reduce environmental losses, and build more resilient, productive crops over time.